In today’s tech-savvy world, wireless headphones like AirPods have become incredibly popular for their convenience and ease of use. Whether you’re a seasoned tech enthusiast or just dipping your toes into the world of wireless audio, this article will guide you on how to connect AirPods to laptop.
We will walk you through the step-by-step process of connecting your AirPods to your laptop, catering to both Windows and Mac users.
To pair your AirPods with your laptop, whether it’s a Windows or Mac, begin by ensuring your AirPods are in pairing mode. On your laptop, navigate to Bluetooth settings and select “Add Device” or similar. Press the setup button on your AirPods case and wait for your laptop to detect them. Once detected, follow the prompts to complete the pairing process.
This method works for various laptop brands like HP and even Chromebooks. Additionally, if you’re looking to pair your AirPods with an iPhone, simply open the case near your iPhone and follow the on-screen instructions for seamless connectivity.
Let’s start!
Content
1. How to Connect AirPods to Laptop?
To connect AirPods to your laptop, whether it’s a MacBook or a Windows device without Bluetooth capability, you can use a third-party Bluetooth adapter. This will enable you to enjoy seamless audio quality and even use the AirPods microphone on your laptop. If you encounter any connection issues, consider resetting your AirPods or exploring alternative wireless headphones for your laptop.
Before we embark on the connection journey, let’s ensure all prerequisites are in place for a successful pairing:
Charged Up: Ensure your AirPods are sufficiently charged as low battery levels can impede the pairing process.
Bluetooth Enabled: Both your laptop and AirPods rely on Bluetooth for communication. Confirm that Bluetooth is activated on both devices.
Let’s explore how to connect AirPods to laptop.
2. Connecting AirPods to a Mac:
Apple products are renowned for their seamless integration. Here’s how to connect your AirPods to your Mac effortlessly:
- Open the AirPods Case: Simply open the charging case with your AirPods snugly inside.
- Hold the Setup Button: Locate the small circular button on the back of the case and press and hold it until the status light begins flashing white.
- Access Control Center: Click on the Control Center icon located in your Mac’s menu bar.
- Select Bluetooth: Within the Control Center, click on the Bluetooth icon.
- Choose Your AirPods: “AirPods” should appear in the list of available devices. Click on it to commence pairing.
Alternative Method (Mac):
If you prefer an alternative approach, follow these steps:
- Go to System Preferences: Click on the Apple icon in the top left corner of your screen and select “System Preferences.”
- Navigate to Bluetooth: Within System Preferences, locate and click on “Bluetooth.”
- Look for AirPods: Ensure Bluetooth is enabled, and your AirPods should appear in the list of devices. Click on “Connect” next to your AirPods.
Connecting AirPods to a Windows Laptop:
While the process for Windows may differ slightly, it remains straightforward:
- Open the AirPods Case: Ensure your AirPods are snugly nestled inside the charging case with the lid open.
- Hold the Setup Button: Press and hold the setup button located on the back of the case until the status light flashes white.
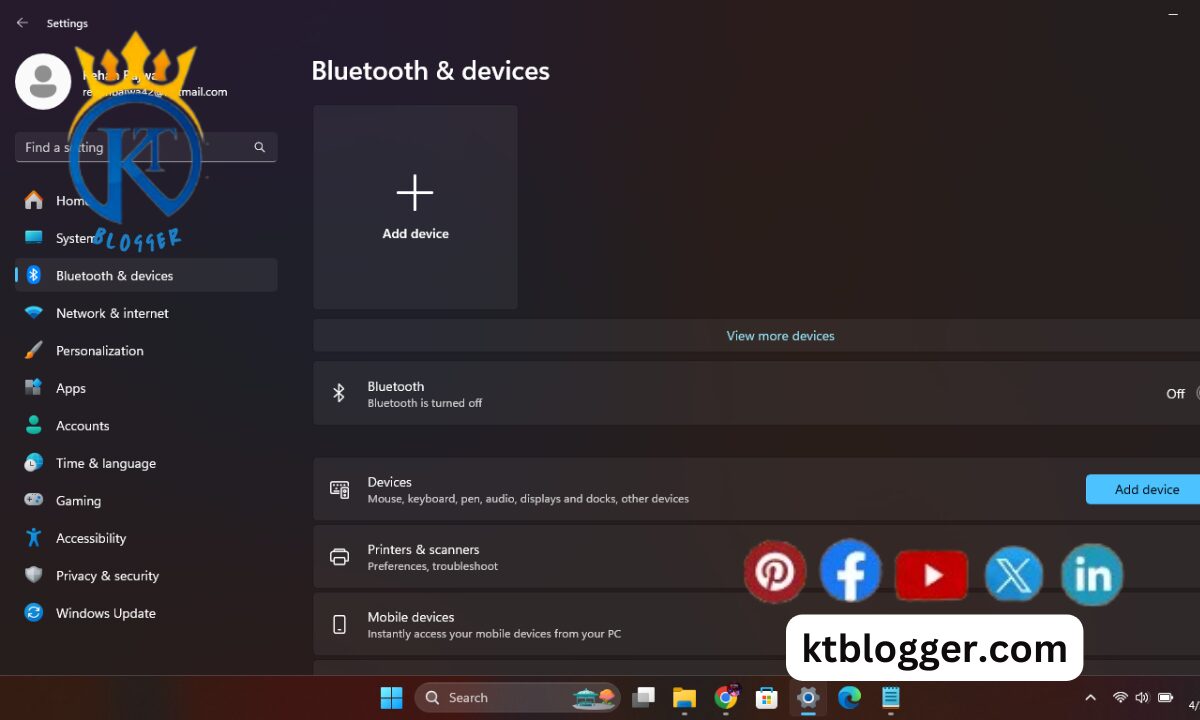
- Access Bluetooth Settings: There are multiple ways to access Bluetooth settings on Windows laptops. Here are two common methods:
- Right-click on the Bluetooth icon in the taskbar and select “Go to settings.”
- Alternatively, press the Windows key, type “Bluetooth settings,” and click on the relevant option.
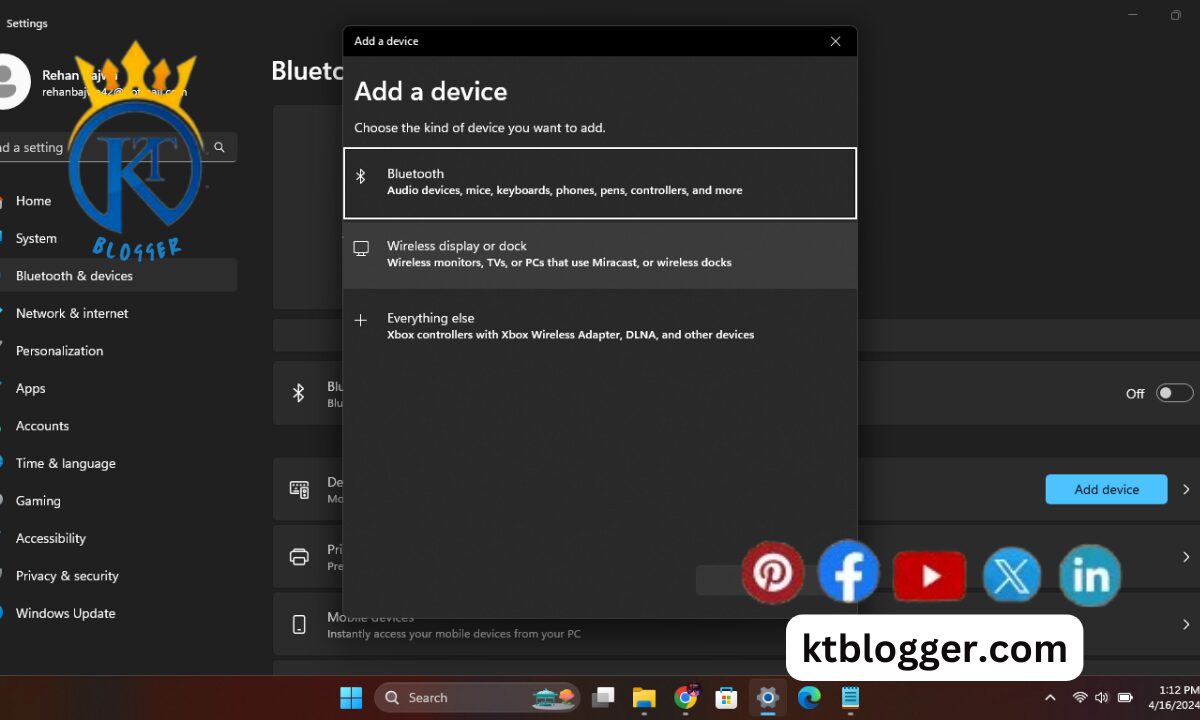
- Add a Device: Within the Bluetooth settings, click on “Add device.”
- Choose Bluetooth: Select “Bluetooth” on the subsequent screen.
- Pair Your AirPods: “AirPods” should be listed as an available device. Click on it to initiate pairing.
3. Troubleshooting Tips:
Encountering difficulties during the connection process is not uncommon. Here are some troubleshooting steps to overcome potential hurdles:
- Double-check Bluetooth: Ensure Bluetooth is enabled on both your laptop and AirPods.
- Restart Devices: A simple restart of your laptop and AirPods can often resolve minor connectivity issues.
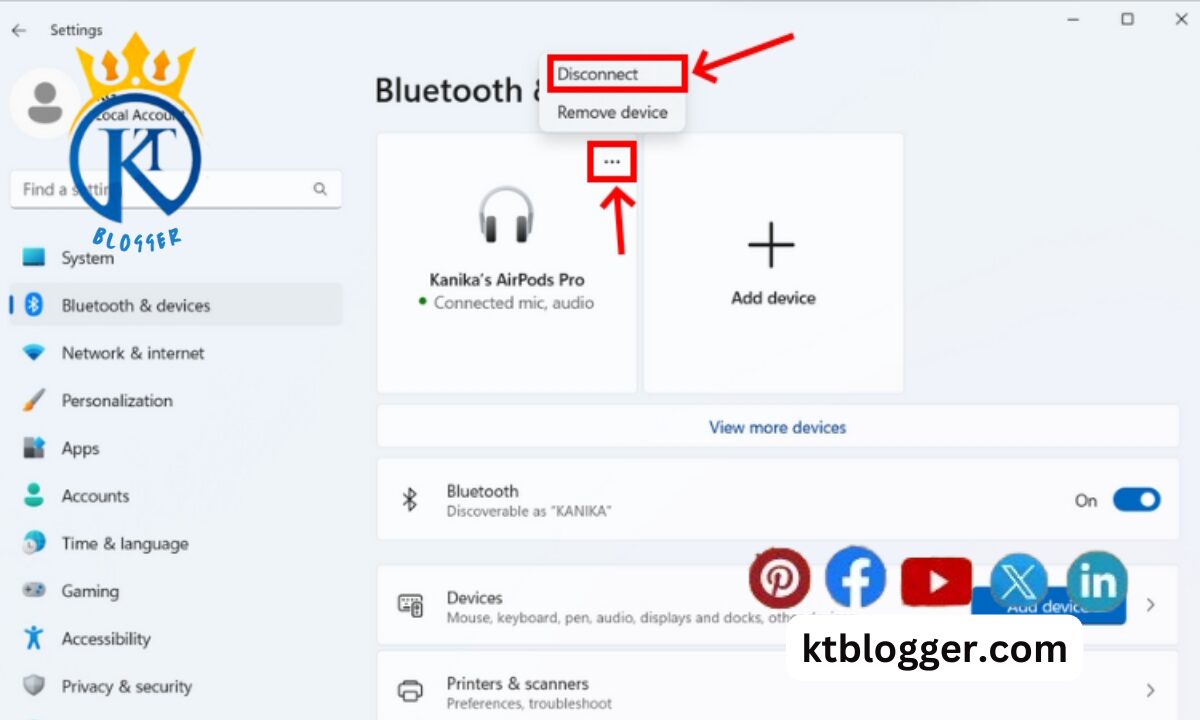
- Forget Device (if previously paired): If you’ve previously connected your AirPods but face issues now, try forgetting the device on your laptop and repairing it.
- Check for Updates: Ensure your laptop has the latest updates installed as outdated software can lead to compatibility issues.
- Reset AirPods: If all else fails, consider resetting your AirPods. Refer to Apple’s support website for specific instructions based on your AirPods model.
4. Advanced Settings and Features:
Once successfully connected, you can explore advanced settings to enhance your AirPods experience:
1. Output and Input Settings
On both Mac and Windows, you can designate your AirPods as the preferred output device for audio playback. Additionally, on Windows, you can set your AirPods as the input device for microphone use during calls.
2. Automatic Ear Detection
Some AirPods models feature automatic ear detection, which pauses playback when you remove an AirPod from your ear and resumes when you put it back in.
3. Noise Cancellation Control
If you own AirPods Pro or Max, you can adjust the level of noise cancellation through your Mac’s Control Center or AirPods settings on your Apple device.
4. Custom Double-Tap Actions
AirPods Pro and Max allow you to customize the action triggered by a double-tap on the AirPods stem.
5. Using AirPods with Multiple Devices:
While AirPods seamlessly switch between Apple devices linked to the same iCloud account, connecting them to multiple non-Apple devices simultaneously may require additional steps:
- Manual Switching: You’ll need to manually connect your AirPods to each device you wish to use them with.
- Third-Party Apps (Windows): Windows users can explore third-party applications to facilitate multi-device switching with AirPods, though these may not be officially supported by Apple.
6. Maximizing Your AirPods Experience:
Now that you’re connected and acquainted with advanced features, here are some ways to leverage your AirPods for a richer laptop experience:
1. Enhanced Productivity
Enjoy distraction-free work sessions with music or podcasts playing through your AirPods.
2. Crystal-Clear Communication
AirPods facilitate seamless online meetings and calls with their built-in microphone and noise-cancellation features.
3. Entertainment on the Go
Whether streaming shows or indulging in gaming sessions, AirPods deliver high-quality audio sans wires.
FAQs
Can I use any AirPods model with my Laptop?
Yes, all AirPods models (AirPods, AirPods 2, AirPods Pro, and AirPods Max) can connect to laptops with Bluetooth capabilities. The connection process might differ slightly between Mac and Windows laptops, but this guide covers the steps for both.
Why won’t my AirPods connect to my Laptop?
There can be a few reasons why your AirPods aren’t connecting. Here are the most common culprits:
- Disabled Bluetooth: Double-check that Bluetooth is turned on for both your laptop and AirPods.
- Connection Issues: Sometimes, a simple restart of your laptop and AirPods can resolve minor glitches.
- Outdated Software: Outdated software on your laptop can cause compatibility problems. Ensure you have the latest updates installed.
- Forgotten Device: If you’ve previously connected your AirPods but are facing issues now, try forgetting the device on your laptop and repairing it.
If none of these solutions work, refer to the troubleshooting tips section in this guide for further assistance.
Can I use my AirPods microphone on my Laptop?
Yes, you can use the AirPods microphone for calls and recordings on your laptop. However, the functionality might be limited compared to a dedicated microphone. On Windows laptops, you can set your AirPods as the input device in the Bluetooth settings.
How do I control the noise cancellation on AirPods Pro or Max while connected to my Laptop?
For Mac users, you can access the noise control settings by clicking on the volume control in the Control Center and then selecting “Noise Control.” Windows users can adjust these settings through the AirPods settings on an Apple device if it’s connected to the same iCloud account as your AirPods.
Summing Up
Connecting your AirPods to your laptop opens avenues for convenience and enhanced audio experiences. By following the outlined steps and exploring available features, you can unlock the full potential of your AirPods, transforming your laptop usage for work, communication, and entertainment.
Additional Tips:
- Invest in a Case: Protect your AirPods with a carrying case to keep them safe from scratches and bumps while ensuring they stay charged.
- Clean Regularly: Maintain optimal audio quality and hygiene by regularly cleaning your AirPods and charging case.
- Keep Software Updated: Ensure both your AirPods firmware and laptop software are up-to-date for optimal performance and compatibility.
I trust this comprehensive guide on “how to connect AirPods to laptop” helps you seamlessly pair your AirPods with your laptop. This connection enables a delightful audio experience!