Are you ready to create your website but not sure where to start? Look no further! WordPress is a popular and user-friendly platform that powers millions of websites worldwide. In this comprehensive guide, we’ll walk you through the step-by-step process of installing WordPress, so you can get your site up and running quickly.
Are you ready to dive into the world of WordPress? Let’s start with the basics. To install WordPress, follow our beginner’s guide for step-by-step instructions. Whether you’re using XAMPP on Windows 10 or cPanel on GoDaddy, we’ve got you covered. Learn how to install WordPress on localhost, cPanel, or any web hosting platform. Ready to take the plunge? Let’s get started!
Content
- 1 How to Install WordPress
- 2 Exploring Your WordPress Dashboard
- 3 FAQs
- 4 Summing Up
How to Install WordPress
Installing WordPress on various platforms like Windows 10 & 11, Ubuntu, Hostinger, GoDaddy, and Ionos is easy. Simply follow the step-by-step guides available online. After installation, configure settings, install plugins, and choose themes. Create blog posts and start your website hassle-free. WordPress is user-friendly and offers troubleshooting solutions for installation issues. Enjoy the best way to set up your WordPress site!
Now, let’s get your website up and running! There are two main approaches to installing WordPress:
- Using your web hosting provider’s built-in installer (often the easiest option)
- Manually installing WordPress (gives you more control over the process)
We’ll explore both methods, so you can choose the one that best suits your comfort level and hosting setup.
Using Your Web Hosting Provider’s Installer
Most web hosting providers offer a user-friendly installer that simplifies the WordPress installation process. Here’s a general roadmap, keeping in mind that specific steps might vary slightly depending on your provider:
- Log in to your web hosting control panel. This is usually accessed through your provider’s website. Look for a login area and enter your credentials.
- Navigate to the “Software” or “Applications” section. Here, you should find a list of applications you can install on your web server.
- Locate the WordPress icon or option. Click on it to launch the installer.
- Follow the on-screen instructions. You’ll typically be prompted to provide some basic information, such as:
- Domain name: This is the web address people will use to access your website (e.g., [invalid URL removed]).
- Site title: This is the name that will appear at the top of your website’s browser window.
- Username and password: Create a username and secure password to access your WordPress administration panel (dashboard).
- Database information: Some providers might handle this automatically, while others might require you to create a database and user specifically for WordPress.
- Click “Install” and wait for the magic to happen! Your web hosting provider will take care of setting up WordPress on your server.
Manual WordPress Installation
If you prefer more control over the installation process or your web hosting provider doesn’t offer an installer, you can manually install WordPress. Here’s a breakdown of the steps involved:
1. Download the latest version of WordPress.
Head over to the official WordPress website https://wordpress.org/download/ and download the latest version of the software. It will be a compressed file (usually .zip format).
2. Extract the downloaded file.
Use a file extraction tool like WinZip or 7-Zip to unzip the downloaded file. This will create a folder containing all the WordPress files.
Upload the WordPress files to your web server
You’ll need an FTP (File Transfer Protocol) client to upload the WordPress files to your web server. Popular FTP clients include FileZilla and Cyberduck.
Here’s a simplified explanation of the FTP process:
- Launch your FTP client and enter your web hosting credentials (hostname, username, and password).
- Connect to your web server.
- Locate the folder where you want to install WordPress. Typically, this is the public_html folder, but it might differ depending on your hosting plan.
- In your local computer’s file explorer, navigate to the extracted WordPress folder.
- Select all the WordPress files and folders (except the wp-config.php file for now).
- Drag and drop the selected files to the desired location on your web server (as identified in the previous step). Your FTP client will upload the files.
Create a database for WordPress
Most web hosting providers offer a database management tool within their control panel. Use this tool to create a new database specifically for WordPress. You’ll also need to create a database user with permission to access this database.
Configure the wp-config.php file
This file contains crucial configuration details for your WordPress installation. Locate the wp-config-sample.php file within the uploaded WordPress folder on your server. Rename it to wp-config.php.
Now, open the wp-config.php file using a text editor. You’ll find specific placeholders within the wp-config.php file that need to be replaced with your actual database information:
- DB_NAME: Replace this with the name of the database you created for WordPress.
- DB_USER: Replace this with the username for the database user you created.
- DB_PASSWORD: Replace this with the password for the database user.
- DB_HOST: In most cases, this will be “localhost” unless your database is hosted on a different server.
Important Security Tip: Never share your database credentials with anyone!
Once you’ve replaced the placeholders with your correct information, save the wp-config.php file. Upload the modified wp-config.php file back to your web server, overwriting the existing file.
Run the WordPress installation script
Now comes the moment of truth! Open a web browser and navigate to the following URL:
http://yourdomainname.com/wp-admin/install.php
Replace “yourdomainname.com” with your actual domain name. This will launch the WordPress installation wizard.
Follow the on-screen instructions
The wizard will guide you through the final steps of setting up your WordPress website. You’ll be prompted to:
Choose a language for your website.
Enter your desired site title and tagline (a brief description of your website).
Create a username and password for your WordPress administrator account (separate from your database credentials). This is the account you’ll use to log in and manage your website.
Choose your search engine visibility preference (you can always change this later).
Click “Install WordPress” and voila!
You’ve successfully installed WordPress on your web server. The wizard will provide a login link to access your WordPress dashboard.
Exploring Your WordPress Dashboard
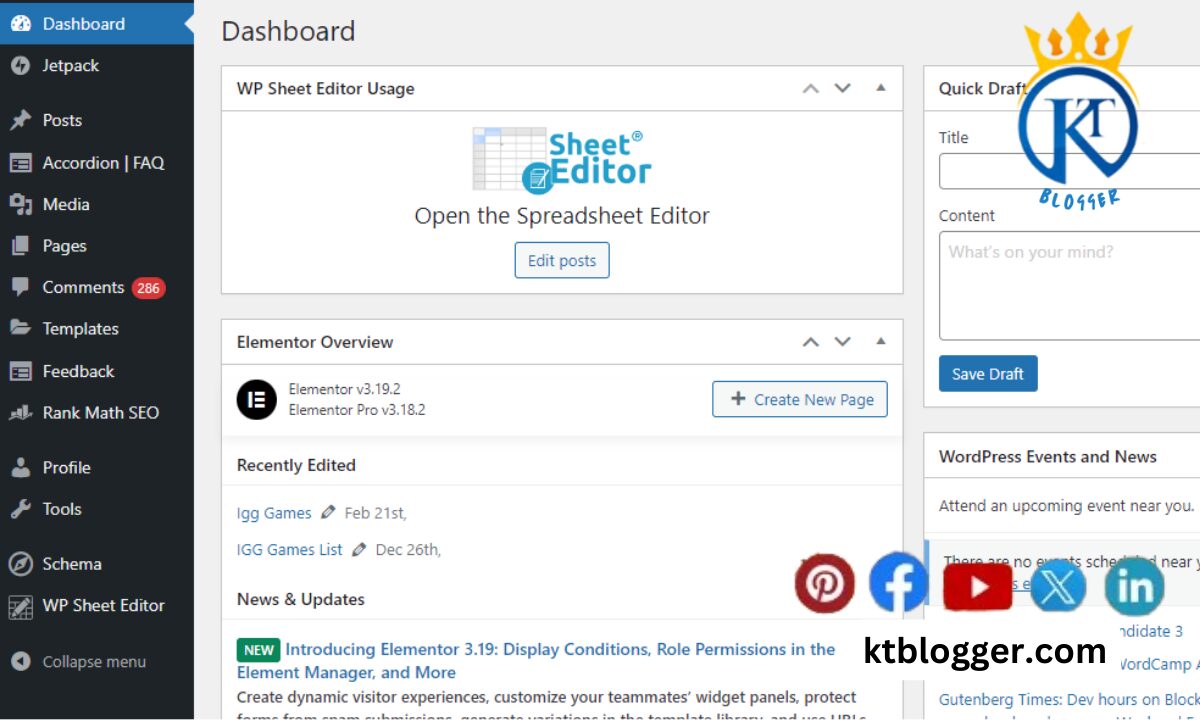
Posts
The “Posts” section of your WordPress dashboard is where you can create, edit, and manage your blog posts and articles. You can organize your posts into categories and tags, schedule them for publication, and control their visibility settings. When you create a new post, you can add text, images, videos, and other media using the built-in editor.
Media
In the “Media” section, you can upload and manage images, videos, audio files, and other media used on your WordPress site. Media files uploaded here can be inserted into posts, pages, or custom post types. WordPress automatically generates different sizes of uploaded images to use in various parts of your site, such as thumbnails and featured images.
Pages
The “Pages” section allows you to create and manage static pages on your WordPress site. Unlike posts, which are typically used for blog content and organized by date, pages are used for timeless content such as about pages, contact pages, and privacy policies. You can create new pages, edit existing ones, and organize them into hierarchies if needed.
Appearance
The “Appearance” section is where you can customize the visual appearance of your WordPress site. This includes changing your site’s theme (overall design), customizing the site’s header, footer, and sidebar widgets, and managing menus. WordPress offers a wide range of free and premium themes, allowing you to personalize your site to match your brand or style preferences.
Plugins
Plugins extend the functionality of your WordPress site by adding new features and capabilities. In the “Plugins” section, you can browse, install, activate, deactivate, and delete plugins. There are thousands of plugins available for WordPress, covering everything from SEO optimization and security enhancements to e-commerce functionality and social media integration. Before installing a plugin, be sure to read reviews, check compatibility, and consider the reputation of the plugin developer.
Settings
The “Settings” section contains various configuration options for your WordPress site. Here, you can adjust settings related to general site information, such as the site title, tagline, and URL structure. You can also configure settings for writing, reading, discussion (comments), media, and permalinks (URL structure). Additionally, some plugins may add their own settings pages to this section for further customization.
FAQs
Is WordPress Installation Free?
Yes, WordPress itself is free and open-source software. You can download it and install it on your web hosting server without any cost.
Do I Need To Know The Coding To Install WordPress?
No, you don’t necessarily need coding knowledge to install WordPress. Most web hosting providers offer user-friendly installation tools that guide you through the process. If you choose the manual installation route, some basic file management skills might be helpful, but the steps are generally straightforward.
How Long Does It Take To Install WordPress?
The installation time can vary depending on the method you choose. Using your web hosting provider’s installer is typically the quickest option, taking just a few minutes. Manual installation might take slightly longer, but it should still be achievable within 30 minutes or less if you follow the steps carefully.
Can I Install WordPress On A Free Web Hosting Platform?
While some free web hosting providers might offer WordPress installation, it’s essential to consider the limitations. Free plans often come with restricted storage space, bandwidth, and functionality. For a serious website, investing in a paid web hosting plan with better features and reliability is recommended.
Summing Up
Installing WordPress doesn’t have to be daunting. Just follow the steps we’ve talked about in this guide, and you’ll soon have your own awesome website up and running. Whether you’re making a blog, an online store, a portfolio, or a business site, knowing how to install WordPress gives you the keys to a world of online possibilities.
With its simple interface and powerful tools, WordPress makes it easy for anyone to create a great website, no matter their skill level. So go ahead, dive in, and start building something amazing!